Magnetic stirrer is a handy tool to help in any household activity, where agitation or mixing of relatively small (under 4L/1Gal) volumes of liquid or suspension are involved – from yeast starter preparation to dissolving fertilizer to chemical experiments. As almost any piece of laboratory equipment, factory-made magnetic stirrers are way overpriced. At the same time, such stirrer is rather easy to make from junk lying around the house. There are plenty of information on the Internet describing building mechanical part of a stirrer. Google for other people’s projects, some of which are much nicer than mine. I started this project mainly to play with motor control piece so mechanical setup was simplified as much as possible. As far a motor control goes, the main difference of mine will be ability to track stirrer bar behaviour. When a bar is spinning close to the maximum speed for given viscosity, it tends to lose strong attraction to the magnet of a motor and stop. Usual remedy is then to slow down the motor until it catches the bar and slowly increase the speed. Since moment of losing attraction is easy to register by monitoring current to the motor, the process of catching the stir bar can be automated. Also, I have a suspicion that a current change will be observed just before the disconnection and can be avoided altogether by corrective action. I will check this possibility during control circuit firmware design. Now, while waiting for Adafruit Motor/Stepper/Servo Shield for Arduino kit to join piles of junk lying around the house, I will describe mechanical implementation of the stirrer.
| The stirrer motor is made of an old PC fan. Two button-type rare-earth magnets are epoxied to it, opposite poles facing up. I also tried a hard drive magnet but didn’t like it; the magnet is too big and much harder to center. Button magnets are easier to work with and are available in several sizes. Also, if you need to increase power, you only need to attach a second magnet on top of one which is already in place. | |
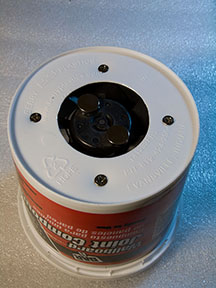
| Empty 3lb wallboard joint compound plastic can will be used as a case for a stirrer. A piece of neoprene rubber (not shown) is glued to the top (i.e. bottom) of the can. | |
| The lid will be used to mount control circuit, consisting of Arduino board with motor shield. Speed will be adjusted with rotary encoder. As far as stir bars, I tested several types, including bare nail, a nail covered in shrink wrap, a nail fused in a piece of glass tube, and overpriced professionaly made standard lab grade teflon-coated bars, the latter being most efficient and strong, especially in non flat-bottom vessels. |
As you can see, mechanical part is pretty simple. Electronics is going to be a little more interesting. Come back in couple of weeks to read about it.
[ Update ] Part 2 posted
Oleg.


[…] the USB Isolation Board and the USB Host Shield has a new, two-part hack for his chemistry set. In Part 1 of this hack, [Oleg] discusses the method he uses to make a stir bar spin and what types of stir […]
[…] the USB Isolation Board and the USB Host Shield has a new, two-part hack for his chemistry set. In Part 1 of this hack, [Oleg] discusses the method he uses to make a stir bar spin and what types of stir […]