Posts

Teensy 3.0 now supported by the USB Host library

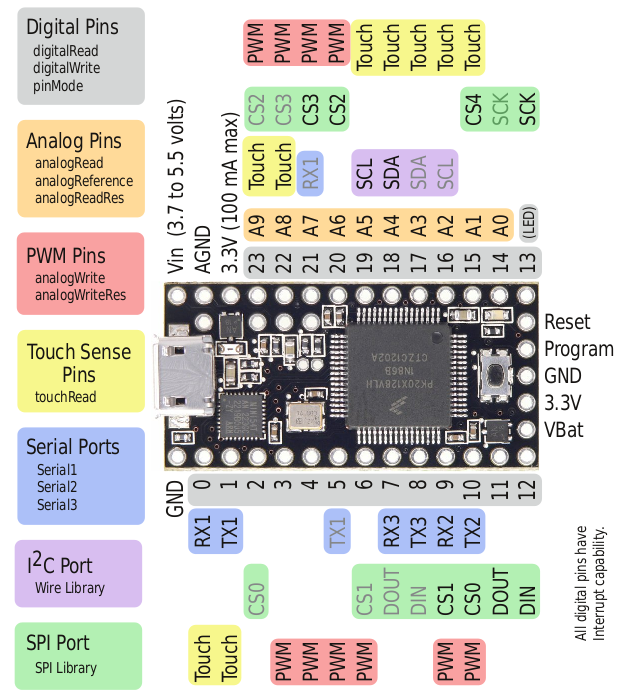
Layout of the Teensy 3.0

Layout of the Teensy 3.0

I am pleased to announce that the first ARM processor is now supported by the USB Host library. It is the Teensy 3.0 which features an 32 bit Cortex-M4 ARM processor running at up to 96MHz. This is a huge increase in speed if you are used to the Arduino Uno running at 16MHz.
The Teensy 3.0 is created by the Paul Stoffregen which is also a dedicated contributor to the Arduino IDE. If you are looking for a ARM based board for your next project, I recommend taking a look at the Teensy 3.0. A more detailed overview can be found at the official page.

To use the Teensy 3.0 with the library I recommend using the Mini variant of the USB Host Shield as it is much more compact and a bit cheaper too. Since the Teensy 3.0 is running at 3.3V no logic conversion is needed.
Note it is very important than you do not connect a 5V microcontroller to the Mini variant of the USB Host Shield, as this might damage the board. If you are planning to use a 5V microcontroller like the Arduino Uno I recommend getting the full sized version of the shield.

In order to use the Teensy 3.0 you will need to connect the Teensy 3.0 to the USB Host shield like so:

USB Host Shield Teensy 3.0
RESET 3.3V
GND GND
INT 9
SS 10
MOSI 11
MISO 12
SCK 13
3.3V 3.3V
GND GND

The images to the right shows both the pinout for the Teensy 3.0 as well as the Mini USB Host Shield.

Layout of the USB Host Shield Mini variant

Layout of the USB Host Shield Mini variant

Furthermore I recommend cutting the VBUS jumper and then soldering a wire from the provided pad on the USB Host shield. This wire can then be connected to the VIN on the Teensy 3.0. The USB Host shield will then get powered directly from the same USB port as the Teensy 3.0 and the VBUS will be 5V as required by most devices – note that you might need a separate 5V regulator depending on which device you are using with the shield, as it might draw too much current.
More information about how to modify the shield can be found at the hardware manual.

Also take a look at the guide for the other Teensy boards, as the wiring is almost the identical.

Hopefully this is just the first of many ARM based boards that is going to be supported by the USB Host shield library.
If you got any questions or comments, then feel free to write a comment below and I will answer as fast as possible.

Update
Both the Teensy 3.1 and Arduino Due is now also supported by the library.
Controlling robotic arm with Arduino and USB mouse

Many people asked me to post a video showing an arm from inverse kinematics article in action. While making a video, I realized that shots of the arm following a pattern of computer-generated coordinates is going to be less than exciting and decided to add manual control. The video below shows the result. In addition to the video, a HID introductory page has been written describing HID communication basics as well as some simple Arduino code. Enjoy! ( Youtube link, where HD quality video can be selected ).

Arduino sketch written for this video is on gitHub.

Robotic Arm Inverse Kinematics on Arduino

Lynxmotion AL5D robotic arm

Lynxmotion AL5D robotic arm


I’m proud owner of Lynxmotion AL5D robotic arm. The parts kit is of very high quality, and as a result, the arm is very strong and versatile. I wanted my arm to be portable and independent of big computers and all currently available controllers lack flexibility that I needed, therefore I started building my own controller around Arduino platform. This article shows first preliminary result of this work – inverse kinematics code which would be used to position the arm.

In robotics, inverse kinematics is a method to position a tip of some linked stricture in 3D space by calculating joint angles from tip X, Y, and Z coordinates. Much information about the subject exists on the web, for example, this introductory article explains the subject using simple trigonometry.

To move the arm, six servos need to be controlled ( five for the arm without wrist rotate ). Given that large amount of processing time would be spent calculating servo angles, I decided not to drive servos directly from Arduino pins and made simple servo shield using Renbotics schematic and library code. I built only half of the circuit using single 4017 counter – this gives me seven servo control channels, which is plenty.

In addition to the article linked above, I’d like to mention two other resources, which helped me tremendously during code development. First is Micromega Application Note 44, which shows inverse kinematics equations for similar arm. They also have nice video of working arm. It should be noted that gripper of AL5D arm has much simpler geometry, therefore second order polynomial calculations are not necessary. The second one is this Lynxmotion project page with Excel spreadsheet. Many formulas from the spreadsheet were used in my code; I also used the spreadsheet during debugging after modifying arm dimensions.

Below is first working draft of inverse kinematics code. It can be used as-is or transformed into a library. As presented, it shall be used with caution – no boundary check is performed so it is quite easy to inadvertently send the arm flying into your forehead or the control board. The code uses single-precision floating point math, which seems to be adequate for the task.


Continue reading Robotic Arm Inverse Kinematics on Arduino