Posts

USB Host Library 3.0-Alpha is out

The alpha of the third revision of USB Host library has been posted on GitHub. The code has been extensively re-organized to make it modular and generic; as a result, it is now possible to run it on more Arduino compatibles and also use native USB Host hardware on some of them. At the time of this writing, USB Hub and Mass Storage classes are supported, the work on migrating the rest of device drivers is in progress.

The code is to be used with Arduino IDE 1.6.1 or newer, please upgrade before attempting to compile it. Also, please read the README file for more details. If you encounter any issues, post them in the issue tracker on GitHub.

The credit for this commit goes to Andrew Kroll – thank you!

Teensy 3.0 now supported by the USB Host library

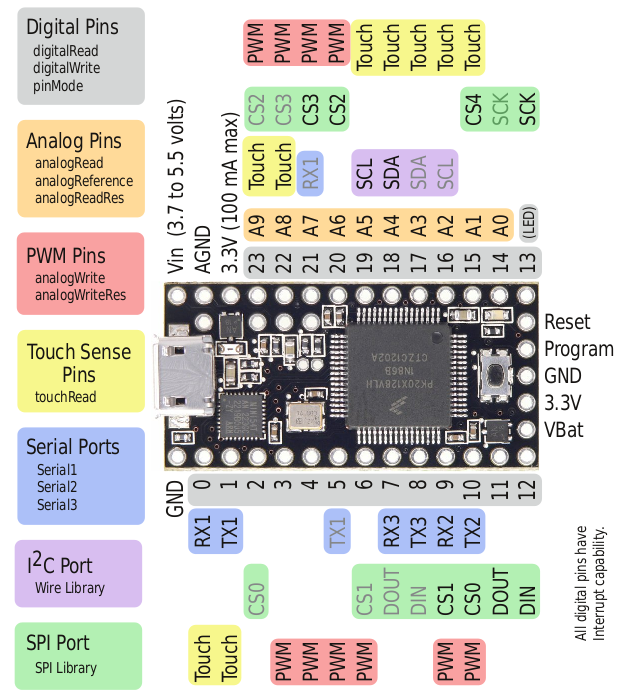
Layout of the Teensy 3.0

Layout of the Teensy 3.0

I am pleased to announce that the first ARM processor is now supported by the USB Host library. It is the Teensy 3.0 which features an 32 bit Cortex-M4 ARM processor running at up to 96MHz. This is a huge increase in speed if you are used to the Arduino Uno running at 16MHz.
The Teensy 3.0 is created by the Paul Stoffregen which is also a dedicated contributor to the Arduino IDE. If you are looking for a ARM based board for your next project, I recommend taking a look at the Teensy 3.0. A more detailed overview can be found at the official page.

To use the Teensy 3.0 with the library I recommend using the Mini variant of the USB Host Shield as it is much more compact and a bit cheaper too. Since the Teensy 3.0 is running at 3.3V no logic conversion is needed.
Note it is very important than you do not connect a 5V microcontroller to the Mini variant of the USB Host Shield, as this might damage the board. If you are planning to use a 5V microcontroller like the Arduino Uno I recommend getting the full sized version of the shield.

In order to use the Teensy 3.0 you will need to connect the Teensy 3.0 to the USB Host shield like so:

USB Host Shield Teensy 3.0
RESET 3.3V
GND GND
INT 9
SS 10
MOSI 11
MISO 12
SCK 13
3.3V 3.3V
GND GND

The images to the right shows both the pinout for the Teensy 3.0 as well as the Mini USB Host Shield.

Layout of the USB Host Shield Mini variant

Layout of the USB Host Shield Mini variant

Furthermore I recommend cutting the VBUS jumper and then soldering a wire from the provided pad on the USB Host shield. This wire can then be connected to the VIN on the Teensy 3.0. The USB Host shield will then get powered directly from the same USB port as the Teensy 3.0 and the VBUS will be 5V as required by most devices – note that you might need a separate 5V regulator depending on which device you are using with the shield, as it might draw too much current.
More information about how to modify the shield can be found at the hardware manual.

Also take a look at the guide for the other Teensy boards, as the wiring is almost the identical.

Hopefully this is just the first of many ARM based boards that is going to be supported by the USB Host shield library.
If you got any questions or comments, then feel free to write a comment below and I will answer as fast as possible.

Update
Both the Teensy 3.1 and Arduino Due is now also supported by the library.

GitHub repository for USB protocol traces

Beagle Analyzer USB hub  trace

Beagle Analyzer USB hub trace


I’m the proud owner of Totalphase Beagle USB 480 protocol analyzer. It helps tremendously in debugging USB code and the software which translates binary traces into human-readable form is free allowing sharing the trace files. Some time ago I needed to capture and share analyzer traces of certain Bluetooth dongles with developers of USB Host Shield 2.0 library. Instead of sharing the traces privately I decided instead to put them into another GitHub repo for everyone to see and learn.

At the moment, the repository contains just a handful of Bluetooth traces, captured on Windows and Linux machines. I will be expanding the repo with other interesting traces generated during my development. Also, if anyone wants a trace from a device not already in the repo – just ask.

Enjoy,
Oleg.

Variable interface levels on FT232RL USB to serial converter

VCCIO

VCCIO


Here is a neat trick I learned today – changing FTDI FT232 interface levels on the fly. An ever popular FT232RL-based USB to serial converter typically comes in two varieties: one is configured for 0-5V logic levels on its TTL pins and the other one for 3.3V. It is usually done by connecting VCCIO pin of FT232 either to 5V coming from USB VBUS or 3.3V from FT232RL internal regulator. Both Sparkfun’s Basic Breakout and Adafruit’s FTDI Friend are made this way. This power arrangement works quite well for simple situations. For more difficult ones, it is possible to make this circuit more clever with a simple modification.

I’m currently working on a controller with battery backup. If regular 5V disappears, the MCU gets its power from a small lithium battery. Debug messages are sent to a PC via UART and I need to see them in both modes of operation, the most interesting being events which occur during the power switch. For the reference, ithium battery through a Shottky diode gives ~2.9V.

That’s how I handle this: The VCCIO pin is disconnected from the rest of the circuit and connected directly to a power pin of the MCU. Since voltage on VCCIO defines the TTL level, the serial communication is functional throughout the whole voltage range of my system. Title picture shows the implementation. I’m using very old Sparkfun “full” FT232RL breakout board, where all pins are available on the side headers. More compact “basic” boards can also be used by simply opening both sides of the power selector jumper and using pad named ‘VCC’ or ‘POWER’ (the pad which is typically used to provide power to the MCU) to connect to MCU power.

I have tested the functionality down to 2.7V and everything works quite nicely. I haven’t checked the datasheet for VCCIO voltage limits but I would imagine it should stop working at about 1.8V. In any case, undervoltage shouldn’t cause any damage to the chip.

Oleg.